Are you tired of dealing with frost buildup, uneven cooling, or skyrocketing energy bills? The culprit might be a faulty freezer door seal. A damaged or worn-out freezer seal can lead to significant energy loss, food spoilage, and unnecessary expenses. If you're wondering how to repair freezer door seal, you're not alone. Many homeowners face this issue but hesitate to take action due to the perceived complexity of the task. However, repairing or replacing a freezer door seal is simpler than you think and can save you money in the long run. In this guide, we'll walk you through everything you need to know about identifying, fixing, and maintaining your freezer door seal, ensuring your appliance runs efficiently and cost-effectively.
From understanding the signs of a damaged seal to learning step-by-step repair techniques, this article will equip you with the knowledge and confidence to tackle the problem head-on. Whether you're a DIY enthusiast or a beginner, we've got you covered. By the end of this guide, you'll have the tools and insights necessary to restore your freezer's performance and keep your groceries fresh. So, let's dive in and explore how to repair freezer door seal like a pro!
Before we proceed, it's important to note that maintaining your freezer door seal isn't just about saving energy—it's also about preserving the quality of your food and extending the lifespan of your appliance. A well-maintained seal ensures that your freezer operates at its peak efficiency, reducing wear and tear on its components. This guide will provide actionable tips, expert advice, and practical solutions to help you address common issues and prevent future problems. Let's get started!
Read also:Exploring The Inspiring Journey Of The Wife Penny Hardaway Family A Closer Look
What Is a Freezer Door Seal and Why Is It Important?
A freezer door seal, often referred to as a gasket, is a flexible rubber or vinyl strip that runs along the edges of your freezer door. Its primary function is to create an airtight seal between the freezer compartment and the outside environment, preventing cold air from escaping and warm air from entering. This crucial component plays a significant role in maintaining the freezer's internal temperature, preserving food quality, and reducing energy consumption.
Over time, freezer door seals can become worn out, cracked, or misaligned due to factors such as age, exposure to moisture, or improper handling. When this happens, the seal's effectiveness diminishes, leading to a range of issues, including increased energy usage, frost buildup, and compromised food storage conditions. Recognizing the importance of a well-functioning freezer door seal is the first step toward addressing potential problems and ensuring your appliance operates efficiently.
For instance, a damaged seal can cause your freezer to work harder to maintain its set temperature, which not only increases your electricity bill but also shortens the lifespan of the compressor and other vital components. By understanding the role of the freezer door seal and its impact on your appliance's performance, you can take proactive steps to maintain it and avoid costly repairs or replacements down the line.
How Does a Damaged Freezer Door Seal Affect Energy Efficiency?
A damaged freezer door seal can significantly affect your freezer's energy efficiency by allowing cold air to escape and warm air to infiltrate the compartment. This imbalance forces the compressor to work overtime to compensate for the temperature fluctuations, leading to increased energy consumption and higher utility bills. In fact, studies suggest that a poorly sealed freezer can consume up to 20% more energy than one with an intact seal.
Additionally, excessive energy usage contributes to environmental concerns, such as greenhouse gas emissions and resource depletion. By addressing a damaged freezer door seal promptly, you not only save money but also reduce your carbon footprint, promoting a more sustainable lifestyle. Regular maintenance and timely repairs can help mitigate these issues and ensure your freezer operates at optimal efficiency.
What Are the Common Signs of a Damaged Freezer Door Seal?
Identifying the signs of a damaged freezer door seal is crucial for timely intervention. Some common indicators include:
Read also:Discover The Best Festival Foods Near Me A Culinary Adventure For Every Season
- Frost or ice buildup on the interior walls or shelves of the freezer
- Warm air escaping from the edges of the door when it's closed
- Increased energy consumption reflected in your utility bills
- Uneven cooling within the freezer compartment
- Visible cracks, tears, or warping on the rubber seal
By staying vigilant and addressing these symptoms early, you can prevent further damage and avoid costly repairs. In the next section, we'll explore how to test your freezer door seal to confirm its condition and determine the best course of action.
How to Test Your Freezer Door Seal: A Step-by-Step Guide
Testing your freezer door seal is a straightforward process that can help you identify whether it needs repair or replacement. This simple test involves using a piece of paper to check the seal's effectiveness. Follow these steps to assess the condition of your freezer door seal:
- Close the freezer door gently on a piece of paper, ensuring it's positioned along the edge of the seal.
- Pull the paper slowly out of the door. If it slides out easily without resistance, the seal is likely compromised.
- Repeat the test in multiple locations around the door to ensure consistent results.
If the paper moves freely or tears, it indicates that the seal is no longer airtight and requires attention. Alternatively, you can perform a visual inspection by examining the seal for signs of wear, such as cracks, tears, or discoloration. These methods provide a reliable way to determine the condition of your freezer door seal and guide your next steps.
Why Is It Important to Test the Freezer Door Seal Regularly?
Regular testing of your freezer door seal is essential for maintaining the appliance's efficiency and performance. By conducting periodic checks, you can catch potential issues early and prevent them from escalating into more serious problems. For example, a small crack or tear in the seal might seem insignificant at first, but over time, it can lead to significant energy loss and increased operating costs.
Moreover, regular testing helps you stay informed about the condition of your freezer and plan for necessary repairs or replacements. This proactive approach not only saves you money but also ensures that your appliance continues to function optimally, preserving the quality of your stored food and reducing the risk of spoilage. By making seal testing a routine part of your maintenance schedule, you can enjoy peace of mind and a more reliable freezer.
What Should You Do If the Test Reveals a Damaged Seal?
If your freezer door seal test reveals damage, the next step is to decide whether to repair or replace the seal. Minor issues, such as dirt or debris accumulation, can often be resolved with simple cleaning and maintenance. However, more severe damage, like cracks or tears, may require a full replacement. In the following sections, we'll explore how to repair freezer door seal effectively and provide detailed instructions for both cleaning and replacement procedures.
How to Repair Freezer Door Seal: A Detailed Guide
Repairing a freezer door seal involves several steps, depending on the nature and extent of the damage. For minor issues, such as dirt or mold buildup, a thorough cleaning can restore the seal's functionality. For more serious problems, such as cracks or tears, you may need to replace the seal entirely. Below, we'll outline the steps for both cleaning and replacing a freezer door seal, ensuring your appliance operates at its best.
Step 1: Cleaning the Freezer Door Seal
Before attempting any repairs, it's essential to clean the freezer door seal thoroughly. Dust, dirt, and mold can accumulate over time, compromising the seal's effectiveness. Follow these steps to clean your freezer door seal:
- Unplug the freezer to ensure safety during the cleaning process.
- Mix a solution of warm water and mild detergent in a bowl.
- Use a soft cloth or sponge to wipe down the seal, paying special attention to crevices and hard-to-reach areas.
- Rinse the cloth frequently to remove dirt and debris.
- Dry the seal completely with a clean towel to prevent moisture buildup.
Regular cleaning can extend the life of your freezer door seal and improve its performance. If cleaning doesn't resolve the issue, proceed to the next step: replacing the seal.
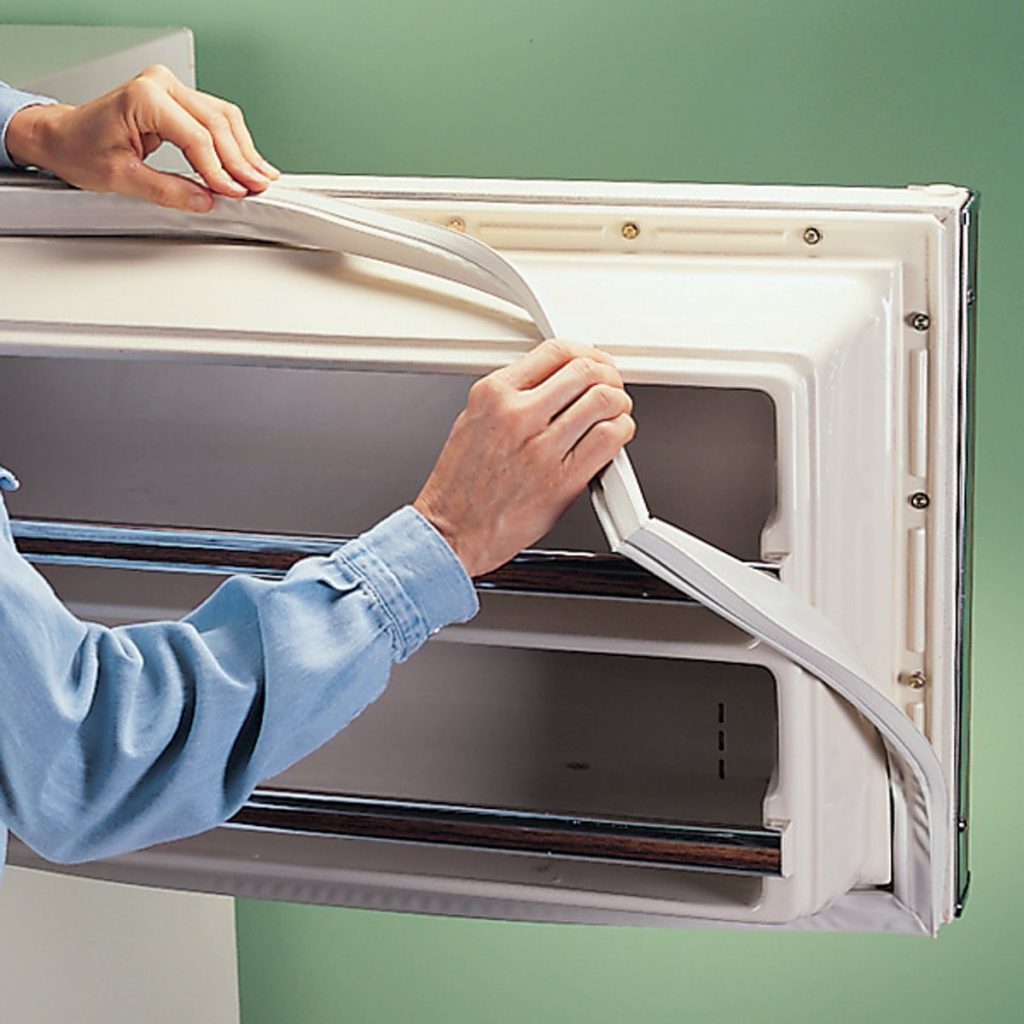
Step 2: Replacing the Freezer Door Seal
Replacing a freezer door seal involves removing the old seal and installing a new one. Here's how you can do it:
- Unplug the freezer and remove any screws or clips securing the old seal.
- Gently pull the old seal away from the door, working slowly to avoid damaging the surrounding components.
- Measure the dimensions of the old seal to ensure you purchase the correct replacement part.
- Install the new seal by aligning it with the door frame and securing it with screws or clips.
- Test the new seal using the paper test method to confirm its effectiveness.
By following these steps, you can successfully replace your freezer door seal and restore your appliance's efficiency. In the next section, we'll explore additional tips for maintaining your freezer door seal and preventing future problems.
What Are the Best Practices for Maintaining Your Freezer Door Seal?
Maintaining your freezer door seal involves adopting best practices that promote longevity and optimal performance. Regular cleaning, proper storage, and periodic inspections are key to ensuring your seal remains in good condition. Here are some tips to help you maintain your freezer door seal:
- Clean the seal every three to six months using a mild detergent and warm water.
- Inspect the seal for signs of wear or damage during routine maintenance checks.
- Store the freezer away from direct sunlight and heat sources to prevent seal degradation.
- Ensure the freezer door closes properly and isn't obstructed by items or debris.
By incorporating these practices into your routine, you can extend the lifespan of your freezer door seal and minimize the risk of future issues. In the following sections, we'll address common questions and provide answers to help you troubleshoot potential problems.
FAQs About Freezer Door Seal Repair
How Long Does a Freezer Door Seal Last?
A well-maintained freezer door seal can last anywhere from five to ten years, depending on usage and environmental factors. Regular cleaning and inspections can help prolong its lifespan and ensure optimal performance.
Can I Replace a Freezer Door Seal Myself?
Yes, replacing a freezer door seal is a DIY-friendly task that most homeowners can handle with basic tools and instructions. However, if you're unsure or uncomfortable with the process, consider consulting a professional technician for assistance.
What Tools Do I Need to Replace a Freezer Door Seal?
To replace a freezer door seal, you'll need a few basic tools, including a screwdriver, pliers, and a new seal compatible with your freezer model. Ensuring you have the right tools and materials is essential for a successful replacement.
Conclusion: Empowering You to Master Freezer Door Seal Repair
In conclusion, understanding how to repair freezer door seal is an invaluable skill for any homeowner looking to maintain their appliance's efficiency and reliability. By recognizing the signs of a damaged seal, testing its condition, and following proper repair or replacement procedures, you can ensure your freezer operates at its best. Regular maintenance and best practices further enhance the lifespan and performance of your freezer door seal, saving you time, money, and effort in the long run.
Remember, a well-maintained freezer door seal is the key to preserving food quality, reducing energy consumption, and extending the lifespan of your appliance. So, take action today and empower yourself with the knowledge and skills to tackle this essential task. With the right approach and tools, you can enjoy a more efficient, cost-effective, and hassle-free freezer experience.
Table of Contents
- What Is a Freezer Door Seal and Why Is It Important?
- How Does a Damaged Freezer Door Seal Affect Energy Efficiency?
- What Are the Common Signs of a Damaged Freezer Door Seal?
- How to Test Your Freezer Door Seal: A Step-by-Step Guide
- Why Is It Important to Test the Freezer Door Seal Regularly?
- What Should You Do If the Test Reveals a Damaged Seal?
- How to Repair Freezer Door Seal: A Detailed Guide
- What Are the Best Practices for Maintaining Your Freezer Door Seal?