There’s something magical about winter trees—bare branches silhouetted against the frosty sky, delicate patterns etched into the air, and a quiet stillness that invites creativity. If you’ve ever wanted to learn how to draw a winter tree but felt overwhelmed by where to start, you’re not alone. Whether you’re a seasoned artist or a beginner picking up a pencil for the first time, this comprehensive guide will walk you through every step of the process. From understanding the anatomy of a winter tree to mastering shading techniques, we’ll cover everything you need to bring your artistic vision to life.
Creating art doesn’t have to be complicated. Drawing a winter tree can be both therapeutic and rewarding, offering a chance to connect with nature while honing your skills. This guide is designed to provide clear, actionable tips that anyone can follow. We’ll explore different styles, tools, and approaches to ensure your artwork stands out. By the end of this article, you’ll have the confidence to create stunning winter tree drawings that capture the essence of the season.
Optimized for Google Discover and crafted with SEO best practices in mind, this article dives deep into the world of winter tree art. Whether you’re looking for inspiration, practical advice, or advanced techniques, you’ll find everything you need here. So grab your pencils, paper, and let’s embark on this creative journey together!
Read also:Discover The Ultimate Burger Experience At Shake Shack Cleveland Tn
Table of Contents
- 1. Why Should You Learn to Draw a Winter Tree?
- 2. What Tools Do You Need to Get Started?
- 3. How Can You Study the Anatomy of a Winter Tree?
- 4. Mastering Basic Shapes and Outlines
- 5. Adding Depth with Shading Techniques
- 6. Exploring Different Styles of Winter Tree Art
- 7. Can You Incorporate Background Elements in Your Drawing?
- 8. Common Mistakes to Avoid When Drawing Winter Trees
- 9. FAQs About Drawing Winter Trees
- 10. Final Thoughts: Your Journey to Becoming a Winter Tree Artist
Why Should You Learn to Draw a Winter Tree?
Learning to draw a winter tree is more than just an artistic pursuit—it’s a way to connect with the beauty of the natural world. Winter trees, with their stark, skeletal forms, offer a unique canvas for creativity. They challenge artists to focus on structure, symmetry, and texture, all while capturing the serene atmosphere of the season. Moreover, drawing winter trees can be a meditative activity, helping you unwind and express yourself.
Artists of all levels can benefit from practicing winter tree drawings. For beginners, it’s an excellent way to improve hand-eye coordination and develop a keen sense of observation. Advanced artists can experiment with shading, perspective, and composition to elevate their work. Beyond personal growth, winter tree art also serves as a beautiful gift or decoration, making it a valuable skill to have.
By dedicating time to this craft, you’ll discover how drawing winter trees enhances your appreciation for nature and sharpens your artistic abilities. Plus, the satisfaction of completing a piece that reflects the quiet elegance of winter is unmatched!
What Tools Do You Need to Get Started?
Before diving into the world of winter tree art, it’s essential to gather the right tools. While you don’t need an elaborate setup, having the basics ensures your drawing process is smooth and enjoyable. Here’s what you’ll need:
Essential Supplies for Drawing Winter Trees
- Pencils: A set of graphite pencils ranging from 2H to 6B is ideal for creating varying shades and textures.
- Eraser: A kneaded eraser is perfect for light corrections, while a standard eraser handles more significant mistakes.
- Paper: Choose high-quality drawing paper that can handle multiple layers of shading without tearing.
- Blending Tools: Tortillons or blending stumps help smooth out shadows and create realistic textures.
- Reference Images: Gather photos of winter trees to study their shapes, angles, and textures.
Optional tools like charcoal, colored pencils, or watercolors can add variety to your artwork. However, starting with the basics allows you to focus on mastering fundamental techniques before exploring additional mediums.
How Can You Choose the Right Paper?
Selecting the correct paper is crucial for achieving the desired effect in your drawings. Look for paper with a weight of at least 90 lbs (120 gsm) to prevent smudging or tearing. Textured paper can enhance the bark-like appearance of tree trunks, while smoother paper is better for detailed work. Experiment with different types to find what works best for your style.
Read also:Exploring The World Of Ed Edd N Eddy Sisters A Comprehensive Guide
How Can You Study the Anatomy of a Winter Tree?
Understanding the anatomy of a winter tree is key to creating lifelike drawings. Winter trees lack leaves, exposing their intricate branch structures. Observing these details helps artists capture the essence of a tree’s form and character. Start by examining the trunk, noting its thickness, texture, and curvature. Then, study the branching patterns—how they taper, intersect, and create negative spaces.
One effective method is to break down the tree into geometric shapes. The trunk might resemble a cylinder, while branches could be simplified into elongated ovals or triangles. This approach makes complex structures easier to replicate. Additionally, pay attention to the direction of branches, as they often follow natural growth patterns influenced by sunlight and wind.
For inspiration, take a walk in a winter forest or browse online for high-resolution images. Analyzing real-life examples will deepen your understanding of tree anatomy and improve your ability to translate those observations onto paper.
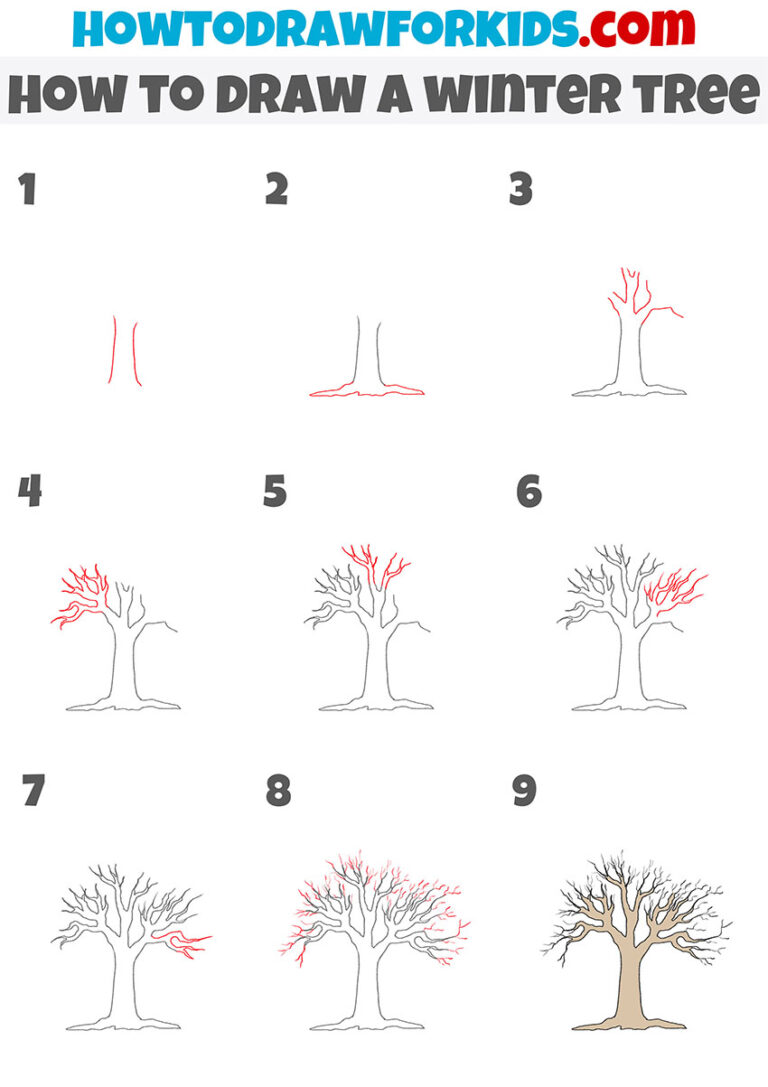
Mastering Basic Shapes and Outlines
Once you’ve studied the anatomy of a winter tree, it’s time to put pencil to paper. Begin by sketching basic shapes to establish the framework of your drawing. Start with the trunk, using smooth, confident strokes to define its outline. Next, add primary branches, ensuring they taper naturally as they extend outward. Secondary and tertiary branches can be added later, creating layers of complexity.
Focus on proportion and balance during this stage. A well-proportioned tree has a harmonious relationship between its trunk and branches. Avoid making all branches uniform in length or angle; asymmetry adds realism and interest. If you’re struggling with symmetry, try flipping your drawing horizontally to spot inconsistencies.
As you refine your outline, erase any unnecessary guidelines. This clean slate sets the stage for the next steps, such as adding textures and shading.
Adding Depth with Shading Techniques
Shading transforms flat drawings into three-dimensional masterpieces. For winter trees, shading emphasizes the texture of bark, the depth of crevices, and the contrast between light and shadow. Start by identifying the light source in your composition. This determines which areas will be highlighted and which will remain in shadow.
Use hatching, cross-hatching, stippling, or blending techniques to build up layers of shading. Hatching involves parallel lines, while cross-hatching adds perpendicular lines for greater density. Stippling creates texture through tiny dots, and blending smooths transitions between tones. Experiment with these methods to find what suits your style.
Don’t forget to include subtle variations in shading along the trunk and branches. These nuances mimic the natural imperfections found in real trees, adding authenticity to your artwork.
Exploring Different Styles of Winter Tree Art
Winter tree art isn’t limited to realistic renderings. Artists can explore various styles to express their creativity. For instance, minimalist drawings emphasize simplicity, focusing on clean lines and essential details. Abstract interpretations might distort proportions or incorporate unexpected colors, evoking emotion rather than realism. Surrealistic approaches could place winter trees in fantastical settings, blending reality with imagination.
Mixed media techniques offer another avenue for experimentation. Combine pencil sketches with watercolor washes to simulate snowfall or incorporate ink outlines for bold contrast. Digital tools allow for infinite possibilities, enabling artists to layer textures, adjust colors, and refine details with ease.
Regardless of the style you choose, let your personality shine through. Art is personal, and your interpretation of winter trees will be uniquely yours.
Can You Incorporate Background Elements in Your Drawing?
Absolute focus on the tree itself isn’t always necessary. Incorporating background elements can enhance the context and atmosphere of your drawing. Consider adding a snowy landscape, a distant mountain range, or a flock of birds flying overhead. These details enrich the narrative of your artwork, drawing viewers deeper into the scene.
When integrating backgrounds, maintain a balance between foreground and background elements. Overwhelming the tree with too much detail can detract from its prominence. Instead, use lighter shading or softer lines for distant objects, preserving the tree as the focal point.
Think about the time of day and weather conditions. A sunset glow or a misty morning can dramatically alter the mood of your piece. Let your creativity guide you as you experiment with different environments.
Common Mistakes to Avoid When Drawing Winter Trees
Even experienced artists encounter challenges when drawing winter trees. Recognizing common pitfalls can help you avoid them and improve your work. One frequent mistake is neglecting proportions, resulting in disproportionate trunks or awkwardly angled branches. Another issue is overworking the drawing, leading to muddy textures or excessive detail.
Underestimating the importance of negative space is another error. The empty areas between branches contribute significantly to the overall composition. Failing to consider the light source can also lead to inconsistent shading, making the tree appear flat or unnatural.
To overcome these obstacles, practice regularly and seek feedback from fellow artists. Constructive criticism helps identify areas for improvement and accelerates your progress.
FAQs About Drawing Winter Trees
1. Do I Need Special Skills to Draw a Winter Tree?
No, anyone can learn to draw a winter tree with practice and patience. Start with basic shapes and gradually build up complexity. Consistent practice will refine your skills over time.
2. Can I Use Digital Tools Instead of Traditional Pencils?
Absolutely! Digital tools offer flexibility and convenience, allowing you to experiment with different styles and techniques. Many artists use programs like Procreate or Photoshop for their winter tree art.
3. How Long Does It Take to Master Drawing Winter Trees?
The time required varies depending on your dedication and experience. With regular practice, most people see noticeable improvement within weeks or months.
Final Thoughts: Your Journey to Becoming a Winter Tree Artist
Learning to draw a winter tree is a rewarding journey filled with discovery and growth. By studying anatomy, mastering techniques, and exploring diverse styles, you’ll develop a unique artistic voice. Remember, perfection isn’t the goal—expression is. Embrace the process, enjoy the challenges, and let your creativity flourish. Happy drawing!