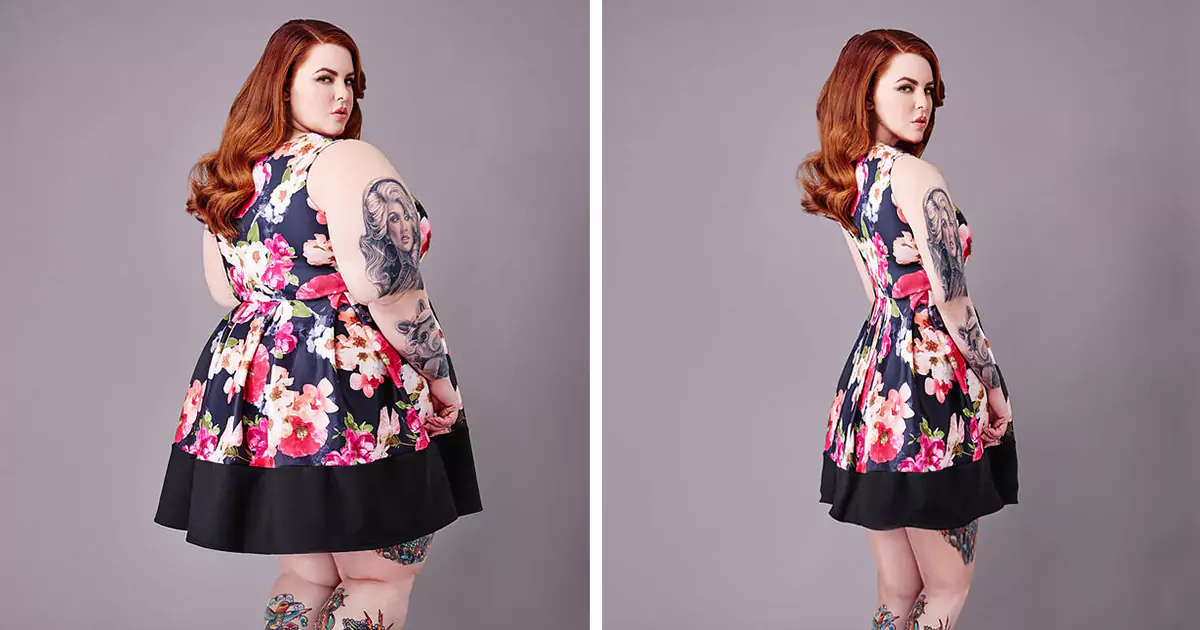
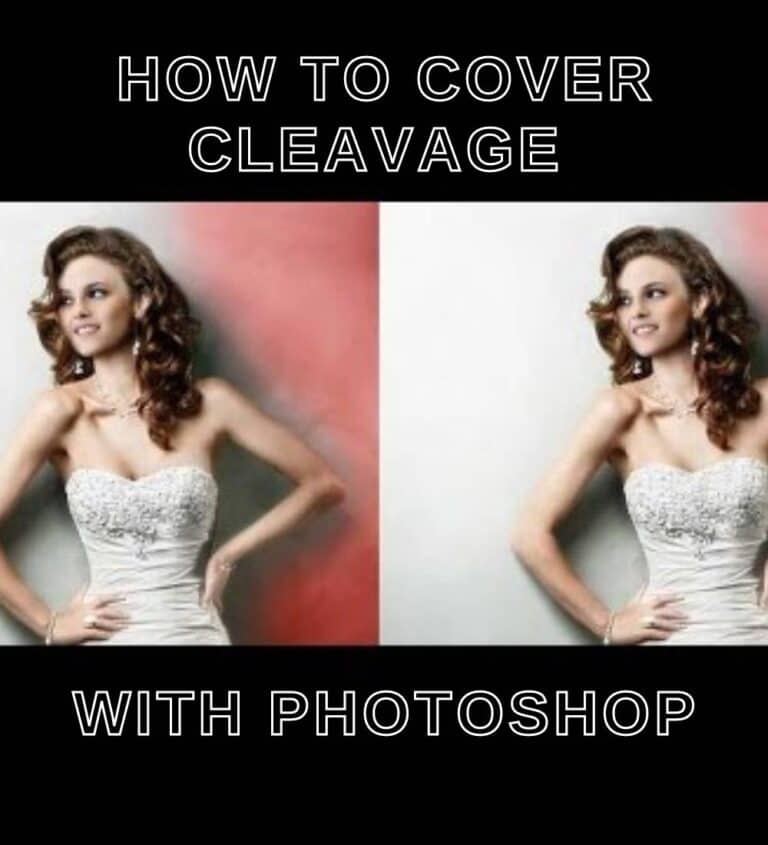
Editing photos to enhance someone's appearance has become a staple in the digital age. Whether you're a professional photographer or an amateur looking to improve your skills, Photoshop offers powerful tools to make someone look thinner. This technique isn't just about altering appearances—it’s about enhancing the subject's features in a way that feels natural and polished. From celebrities to everyday individuals, the demand for photo retouching is at an all-time high, and mastering this skill can set you apart in the creative field. With the right techniques, you can achieve professional-level results without making the edits look obvious or overdone.
Photoshop's versatility makes it one of the most popular software tools for photo editing. However, learning how to use it effectively requires patience, practice, and a keen eye for detail. If you're new to photo editing, don't worry—this guide will walk you through the process step by step. We'll cover everything from basic tools to advanced techniques, ensuring you have the knowledge to make someone look thinner while maintaining the integrity of the image. By the end of this article, you'll have the confidence to tackle any photo editing project with ease.
Whether you're working on a personal project or looking to enhance images for a client, mastering the art of photo retouching is invaluable. In this article, we'll explore the ins and outs of Photoshop, including tips, tricks, and best practices. You'll learn how to make someone look thinner in Photoshop while ensuring the results look natural and professional. So, let's dive in and unlock the full potential of this powerful software.
Read also:The Ultimate Guide To Zip Zap Tv Guide Unlocking Your Entertainment
Table of Contents
- 1. Introduction to Photo Editing with Photoshop
- 2. Biography of Photoshop: The Story Behind the Software
- 3. What Tools Do You Need to Make Someone Look Thinner in Photoshop?
- 4. Basic Techniques: How to Start Editing?
- 5. Advanced Techniques: Taking Your Skills to the Next Level
- 6. Common Mistakes to Avoid When Editing Photos
- 7. How to Make Someone Look Thinner in Photoshop?
- 8. Pro Tips for Achieving Natural Results
- 9. FAQs About Photo Editing in Photoshop
- 10. Conclusion: Embrace Your Creative Potential
Introduction to Photo Editing with Photoshop
Photo editing is an art form that combines creativity with technical expertise. Adobe Photoshop, one of the most widely used photo editing software tools, offers a range of features designed to enhance and transform images. While some may view photo editing as a simple process, the reality is that it requires a deep understanding of both the software and the principles of design. When it comes to editing human subjects, the goal is to enhance their features while maintaining a natural appearance.
Why is Photoshop so popular? One of the primary reasons is its versatility. Whether you're cropping images, adjusting colors, or applying advanced filters, Photoshop has the tools to meet your needs. For those looking to make someone look thinner in Photoshop, the software provides a variety of options, from simple adjustments to complex manipulations. Understanding how to use these tools effectively is key to achieving professional results.
In this section, we'll explore the basics of photo editing with Photoshop, including an overview of its interface, essential tools, and how to navigate the software. By the end, you'll have a solid foundation to build upon as you delve deeper into the world of photo retouching.
Biography of Photoshop: The Story Behind the Software
Adobe Photoshop has a rich history that dates back to the late 1980s. Originally developed by Thomas and John Knoll, the software revolutionized the way people approached digital imaging. Over the years, Photoshop has evolved into a powerhouse tool used by photographers, graphic designers, and artists worldwide. Its impact on the creative industry cannot be overstated.
| Founder | Year Founded | Initial Name | Current Version |
|---|---|---|---|
| Thomas and John Knoll | 1988 | Display | Photoshop 2023 |
From its humble beginnings as a simple image viewer to its current status as a leading photo editing software, Photoshop has consistently pushed the boundaries of what's possible in digital design. Its influence extends beyond the creative field, impacting industries such as advertising, fashion, and entertainment. As you embark on your journey to master Photoshop, remember that you're joining a legacy of innovators who have shaped the digital landscape.
What Tools Do You Need to Make Someone Look Thinner in Photoshop?
Before diving into the editing process, it's important to familiarize yourself with the essential tools in Photoshop. While the software offers a wide array of features, not all of them are necessary for making someone look thinner. Below, we'll highlight the most commonly used tools and explain how they can be applied to achieve your desired results.
Read also:Mastering The Art Of Hanging A Comprehensive Guide On How To Put Up A Picture Frame On The Wall
Lasso Tool: This tool allows you to select specific areas of an image, making it easier to focus on the parts you want to edit. By carefully outlining the areas you wish to adjust, you can ensure that your edits are precise and targeted.
Brush Tool: The brush tool is invaluable for smoothing out lines and curves. When used in conjunction with layers, it provides greater control over the editing process, allowing you to make subtle changes without affecting the overall image.
Layer Masks: Layer masks are a powerful feature that enable you to hide or reveal parts of a layer. This is particularly useful when you want to make someone look thinner without altering the rest of the image. By using layer masks, you can achieve a seamless transition between the edited and unedited areas.
Basic Techniques: How to Start Editing?
Once you've familiarized yourself with the tools, it's time to start editing. Begin by opening your image in Photoshop and creating a duplicate layer. This ensures that you have a backup of the original image in case you need to revert to it later. Next, select the areas you wish to adjust using the lasso tool. Be sure to zoom in for greater precision, as even small adjustments can make a significant difference.
After selecting the desired areas, use the brush tool to smooth out any unwanted lines or curves. Start with a low opacity setting to make gradual changes, gradually increasing the intensity as needed. Remember to work in layers, as this will give you greater flexibility and control over the editing process. By following these basic techniques, you'll be well on your way to mastering the art of photo retouching.
Advanced Techniques: Taking Your Skills to the Next Level
While basic techniques are sufficient for many editing tasks, advanced techniques can take your skills to the next level. One such technique is the use of Liquify, a powerful tool that allows you to manipulate the shape and structure of an image. Liquify is particularly effective when making someone look thinner, as it enables you to adjust proportions without distorting the image.
Another advanced technique is the use of curves. By adjusting the curves in your image, you can enhance contrast and create a more polished look. This is especially useful when working with portraits, as it helps bring out the subject's features while maintaining a natural appearance. Experiment with these techniques to discover what works best for your specific project.
Common Mistakes to Avoid When Editing Photos
Even the most experienced editors make mistakes from time to time. To ensure your edits look professional, it's important to be aware of common pitfalls and how to avoid them. One of the most frequent mistakes is over-editing, which can result in an unnatural or distorted appearance. Always aim for subtlety, making changes that enhance rather than alter the subject's features.
Another common mistake is failing to work in layers. By neglecting to use layers, you risk losing valuable data and limiting your ability to make adjustments. Additionally, failing to save your work regularly can lead to frustration and lost progress. To avoid these issues, develop good habits from the start and always prioritize organization and precision.
How to Make Someone Look Thinner in Photoshop?
Making someone look thinner in Photoshop involves a combination of techniques and tools. Begin by selecting the areas you wish to adjust using the lasso tool. Once you've made your selection, use the brush tool to smooth out any unwanted lines or curves. Gradually increase the intensity of your edits, working in layers to ensure a seamless transition between the edited and unedited areas.
For more advanced edits, consider using the Liquify tool. This powerful feature allows you to manipulate the shape and structure of an image, making it easier to adjust proportions without distorting the subject's appearance. Remember to work with a low opacity setting to make gradual changes, as this will help you achieve a more natural look. By combining these techniques, you can make someone look thinner while maintaining the integrity of the image.
Pro Tips for Achieving Natural Results
Achieving natural results is key to successful photo editing. Here are a few pro tips to help you master the art of photo retouching:
- Work in Layers: Always use layers to give yourself greater flexibility and control over the editing process.
- Zoom In: Zooming in allows you to make precise adjustments, ensuring that your edits are accurate and effective.
- Use Low Opacity Settings: Start with a low opacity setting to make gradual changes, gradually increasing the intensity as needed.
- Experiment with Curves: Adjusting the curves in your image can enhance contrast and create a more polished look.
- Save Regularly: Develop good habits by saving your work regularly to avoid losing progress.
FAQs About Photo Editing in Photoshop
Q: How long does it take to learn Photoshop?
A: The time it takes to learn Photoshop varies depending on your experience and dedication. With regular practice, you can master the basics in a few weeks, while advanced techniques may take months or even years to perfect.
Q: Can I use Photoshop for free?
A: Adobe Photoshop offers a free trial version that allows you to explore its features for a limited time. After the trial period, you'll need to purchase a subscription to continue using the software.
Conclusion: Embrace Your Creative Potential
Learning how to make someone look thinner in Photoshop is a valuable skill that can enhance your creative potential. By mastering the tools and techniques outlined in this guide, you'll be able to achieve professional-level results with ease. Remember to always aim for subtlety and natural results, as this will ensure your edits look polished and polished. So, embrace your creativity and unlock the full potential of Photoshop today!