Have you ever marveled at the intricate beauty of a penguin's sleek silhouette or the texture of its feathers? Drawing a realistic penguin can seem daunting, but with the right techniques and practice, anyone can master this art. Whether you're an aspiring artist or simply looking to explore your creative side, learning how to draw realistic penguin is an excellent way to refine your skills. This guide will walk you through every step, from understanding the anatomy of a penguin to adding the final touches that bring your artwork to life.
Creating a lifelike penguin involves more than just sketching its outline. It requires a deep understanding of proportions, shading, and texture. Penguins have unique features that set them apart from other birds, such as their streamlined bodies, webbed feet, and striking black-and-white coloration. By breaking down these elements into manageable steps, we'll make the process accessible and enjoyable for artists of all levels. Whether you're using pencils, digital tools, or even charcoal, this guide will equip you with the knowledge to bring your penguin drawings to life.
Our goal is not only to teach you how to draw realistic penguin but also to inspire confidence in your artistic abilities. Through detailed instructions, practical tips, and expert advice, you'll gain the tools necessary to create stunning works of art. So grab your sketchbook, pencils, and let's dive into the fascinating world of penguin artistry!
Read also:Discover The Best Places To Eat In Brier Creek For Every Occasion
Table of Contents
- 1. Why Is It Important to Learn How to Draw Realistic Penguin?
- 2. What Are the Essential Tools for Drawing Penguins?
- 3. Understanding Penguin Anatomy
- 4. How to Begin Your Penguin Sketch?
- 5. Adding Details: Feathers, Eyes, and Beak
- 6. Techniques for Shading and Texturing Your Penguin
- 7. Common Mistakes to Avoid When Drawing Penguins
- 8. How to Draw Realistic Penguin: Step-by-Step Guide
- 9. FAQs About Drawing Penguins
- 10. Final Thoughts
Why Is It Important to Learn How to Draw Realistic Penguin?
Drawing realistic animals, such as penguins, offers numerous benefits that extend beyond mere artistic expression. Firstly, it enhances your observational skills. To draw a penguin accurately, you must study its anatomy, posture, and environment. This process sharpens your ability to notice subtle details, which is a valuable skill in both art and everyday life. Secondly, learning how to draw realistic penguin improves your technical abilities as an artist. Mastering techniques like shading, texture, and proportion helps you create more dynamic and engaging artwork across various subjects.
Moreover, drawing penguins allows you to connect with nature and wildlife in a meaningful way. Penguins are fascinating creatures with unique characteristics that make them stand out. By capturing their essence on paper, you gain a deeper appreciation for their beauty and resilience. Additionally, creating realistic penguin drawings can be a rewarding hobby that brings joy and fulfillment. It's a creative outlet that allows you to express yourself while continuously improving your skills.
Finally, learning how to draw realistic penguin can open doors to professional opportunities. Many industries, from animation to graphic design, value artists who can create lifelike representations of animals. By honing your skills in this area, you position yourself as a versatile and skilled artist capable of tackling complex projects.
What Are the Essential Tools for Drawing Penguins?
Before diving into the process of drawing a penguin, it's crucial to gather the right tools. While some artists prefer traditional methods, others enjoy the flexibility of digital tools. Here’s a list of essential items you’ll need:
- Pencils: A set of graphite pencils ranging from 2H to 6B is ideal for sketching and shading.
- Erasers: A kneaded eraser and a white vinyl eraser are indispensable for correcting mistakes and creating highlights.
- Sketchbook: Choose a high-quality paper that can handle various mediums, especially if you plan to experiment with shading techniques.
- Pens: Fine-tip pens or ink liners are great for adding details and outlines.
- Blending Tools: Tortillons, blending stumps, or cotton swabs help achieve smooth transitions in shading.
For digital artists, consider investing in a graphics tablet and software like Adobe Photoshop or Procreate. These tools offer endless possibilities for creating vibrant and detailed penguin drawings.
Why Should You Invest in Quality Art Supplies?
Using quality art supplies makes a significant difference in the outcome of your drawings. High-grade pencils provide better control and produce smoother lines, while premium paper ensures your artwork retains its integrity over time. Investing in reliable tools allows you to focus on your creativity without worrying about performance issues. Plus, working with quality materials can boost your confidence and motivation, encouraging you to push your limits further.
Read also:Experience The Best Dining In Old Town Pasadena For Food Lovers
Understanding Penguin Anatomy
To draw a realistic penguin, it's essential to understand its anatomy. Penguins have a streamlined body designed for swimming, with short, powerful legs and webbed feet. Their wings, though not used for flying, are adapted for underwater propulsion. The head is relatively small compared to the body, with a pointed beak and large, expressive eyes. By studying these features, you can create more accurate and lifelike drawings.
One of the key aspects of penguin anatomy is their posture. Unlike many birds, penguins walk upright, giving them a distinctive silhouette. They also exhibit a wide range of poses, from standing tall to huddling together for warmth. Observing these postures in photographs or videos can help you capture the essence of a penguin in your drawings. Additionally, understanding the muscle structure and bone placement can guide you in achieving proper proportions and movement in your artwork.
Another important element is the penguin's plumage. Penguins have dense, overlapping feathers that provide insulation and waterproofing. These feathers create a smooth, sleek appearance that requires careful attention to detail when drawing. By studying the patterns and textures of penguin feathers, you can add depth and realism to your artwork.
How Can You Study Penguin Anatomy Effectively?
Studying penguin anatomy involves more than just looking at pictures. It requires active observation and analysis. Start by examining reference images from multiple angles to understand how the body changes in different poses. Take note of the proportions between the head, body, and limbs. Sketch quick thumbnails to practice capturing these proportions quickly and accurately. Additionally, consider watching videos of penguins in motion to observe how their bodies move and interact with their environment.
What Are Some Reliable Resources for Penguin Anatomy?
There are several excellent resources available for studying penguin anatomy. Online platforms like Pinterest and DeviantArt offer a wealth of reference images and tutorials. Books on animal anatomy, such as "Drawing Animals" by Jack Hamm, provide in-depth insights into the structure and movement of various species. Museums and zoos also offer opportunities to observe live penguins, providing invaluable firsthand experience for aspiring artists.
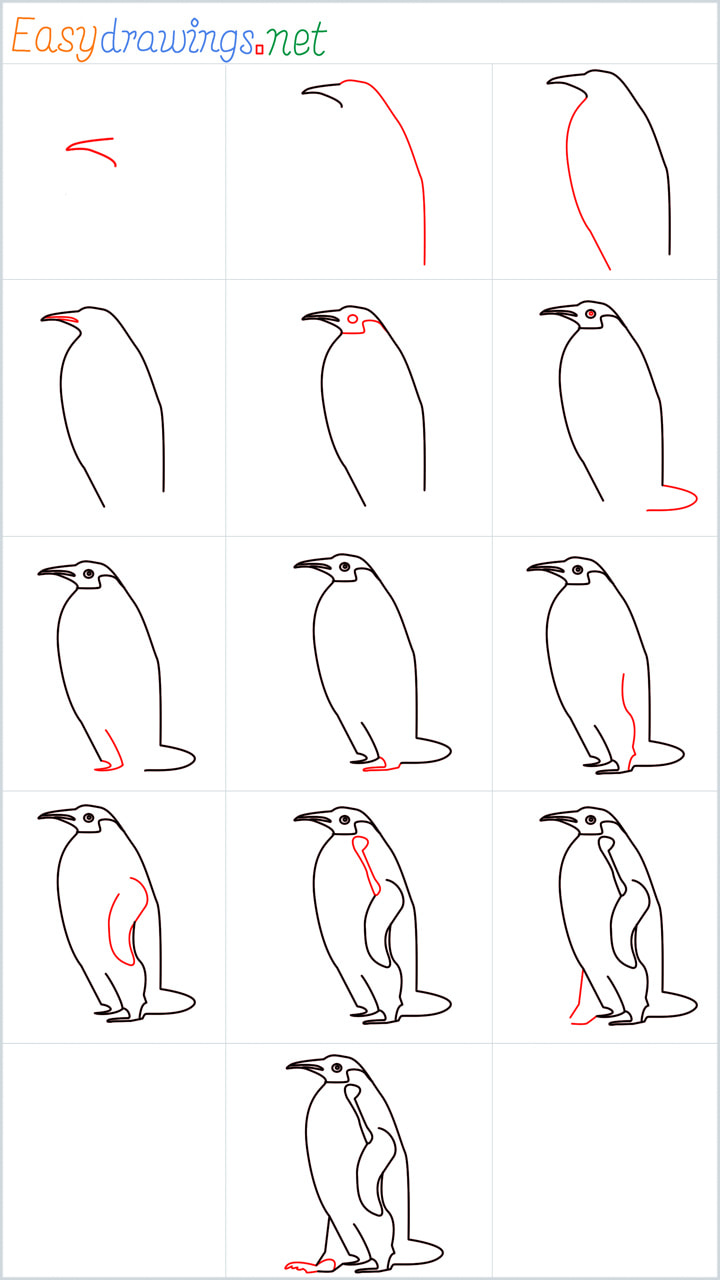
How to Begin Your Penguin Sketch?
Starting your penguin sketch can feel overwhelming, but breaking it down into manageable steps makes the process much easier. Begin by sketching a basic outline of the penguin's body. Use simple shapes, such as ovals and rectangles, to establish the proportions. Focus on capturing the overall shape and posture before adding details. This initial stage is crucial for ensuring your drawing has a solid foundation.
Once you've established the basic shape, refine the outline by smoothing out the edges and adjusting proportions as needed. Pay attention to the curve of the body, the placement of the wings, and the position of the head. These elements contribute to the overall realism of your drawing. Don't worry about making everything perfect at this stage; think of it as a rough draft that you'll refine as you progress.
After completing the outline, lightly sketch the facial features and other key details. This includes the beak, eyes, and webbed feet. Use light, gentle strokes to avoid committing too early to specific details. Remember, the goal at this stage is to establish the basic structure and proportions of your penguin.
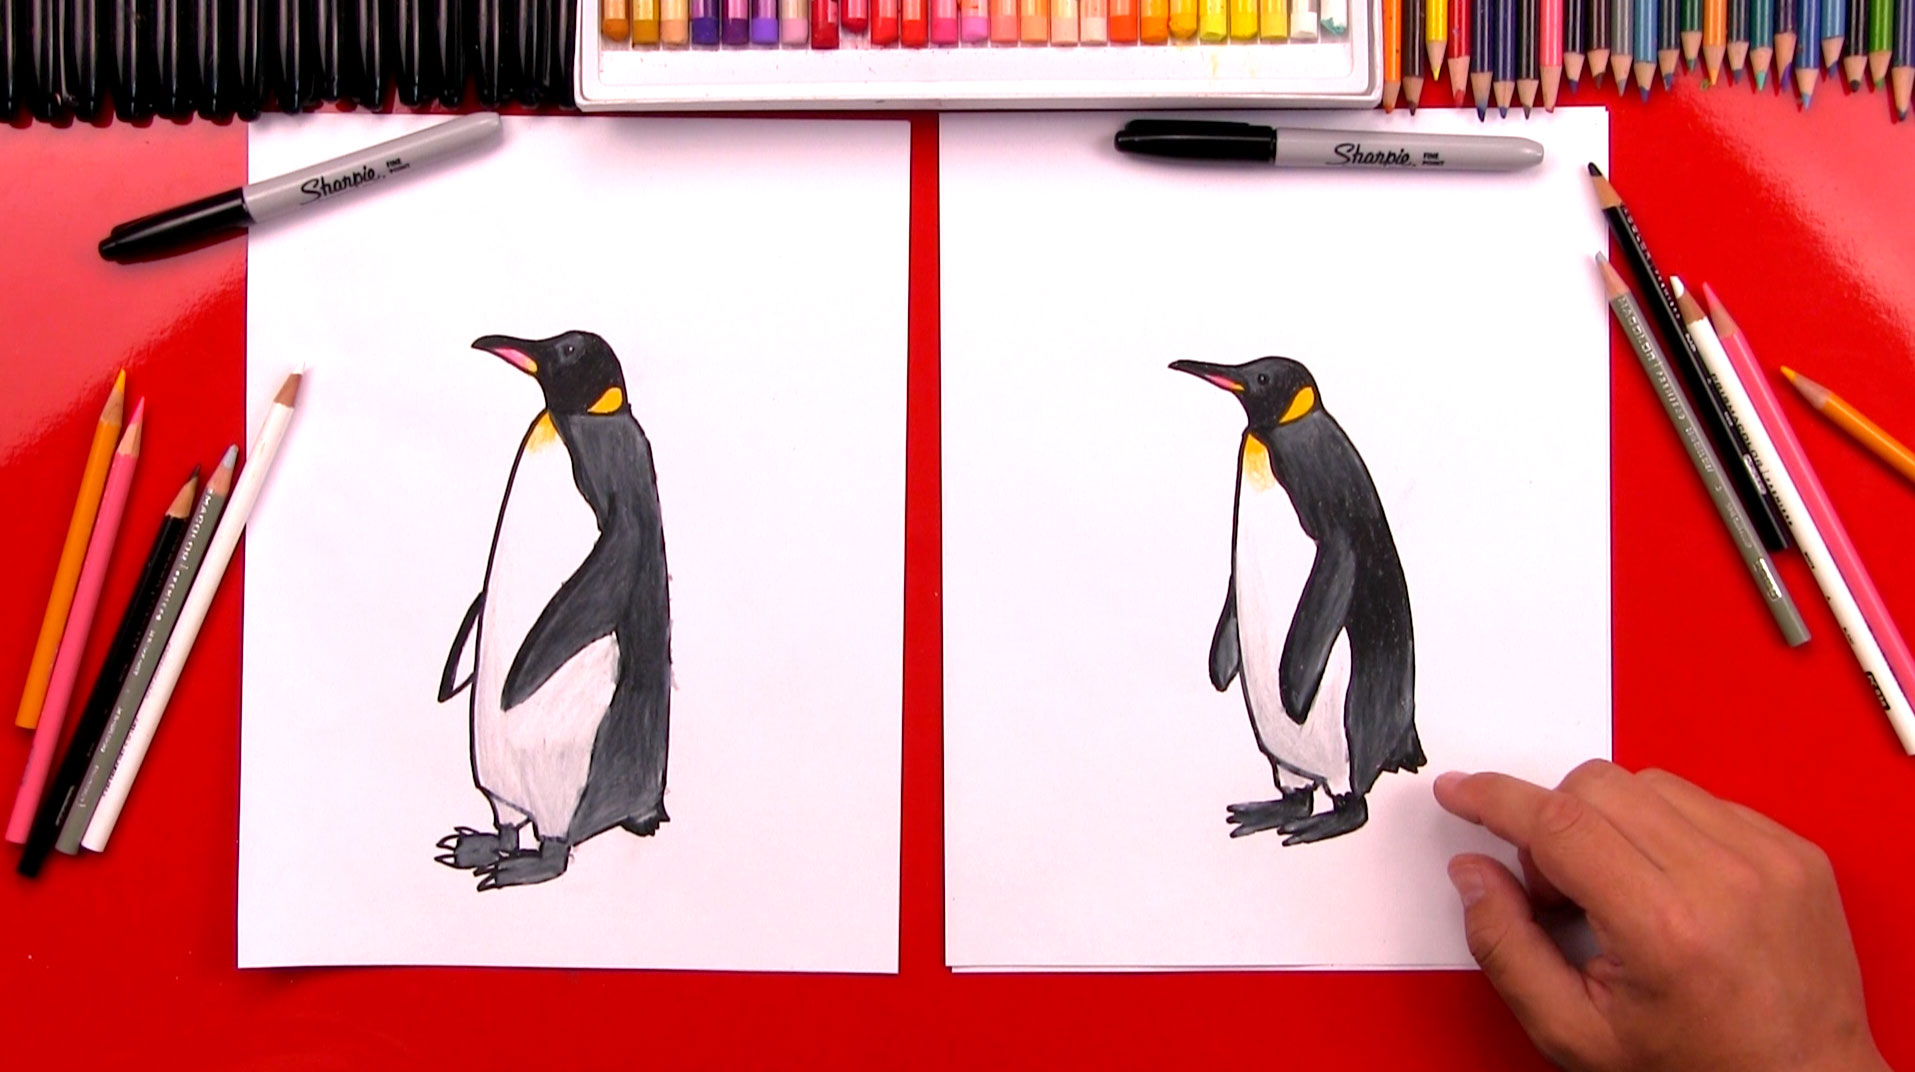
Adding Details: Feathers, Eyes, and Beak
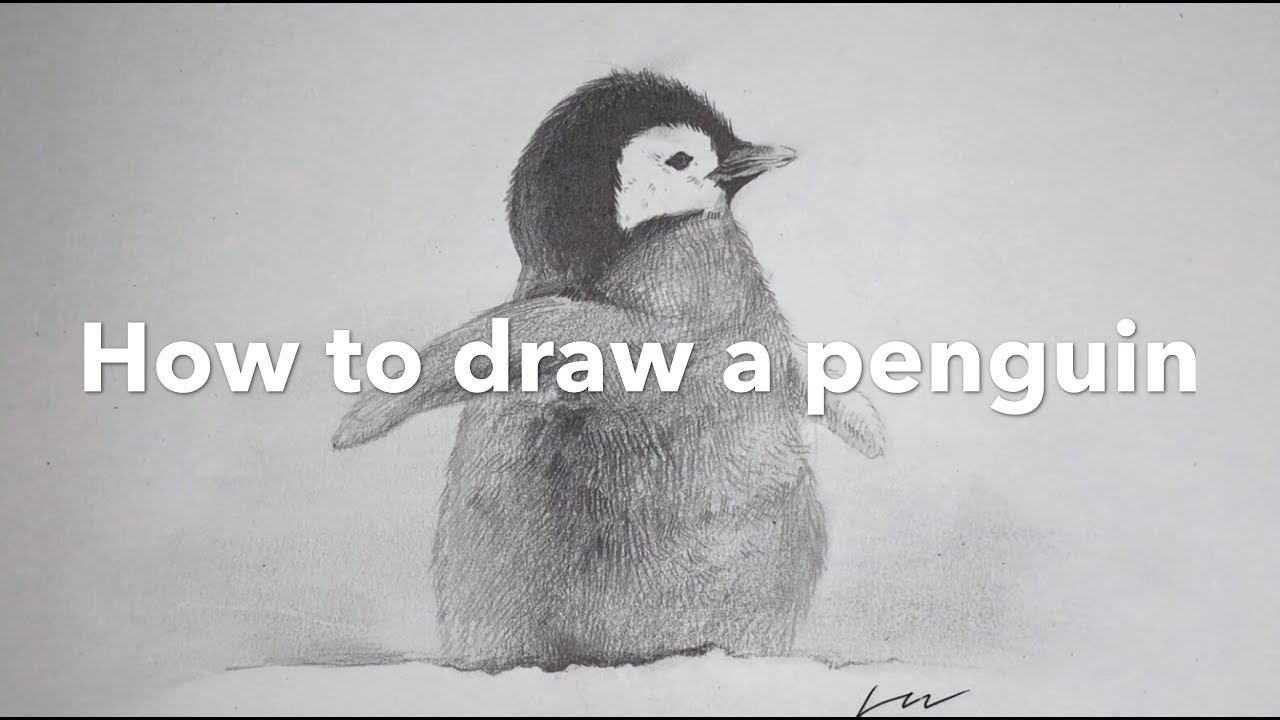
With the foundation in place, it's time to add the details that bring your penguin to life. Start with the feathers, which are perhaps the most distinctive feature of a penguin. Use short, overlapping strokes to mimic the texture of feathers. Pay attention to how the feathers flow along the body, creating a smooth, streamlined appearance. For added realism, vary the pressure of your pencil to create subtle variations in tone and texture.
Next, focus on the eyes and beak. Penguins have large, round eyes that convey curiosity and intelligence. Use a fine-tip pen or pencil to carefully outline the eyes, adding pupils and highlights to make them appear lifelike. The beak is another defining characteristic of a penguin. Study reference images to understand its shape and proportions, then sketch it with precision. Pay attention to how the beak connects to the head and how it interacts with the surrounding feathers.
Finally, don't forget the webbed feet. While often overlooked, the feet play a crucial role in a penguin's anatomy. Sketch them with care, ensuring they align with the body's proportions. Adding small details like claws and texture can enhance the realism of your drawing.
Techniques for Shading and Texturing Your Penguin
Shading and texturing are essential for creating a realistic penguin drawing. Start by identifying the light source and determining where shadows will fall. Use hatching and cross-hatching techniques to add depth and dimension to your drawing. Gradually build up layers of shading, starting with light strokes and increasing pressure as needed. This approach helps create smooth transitions between light and shadow, giving your penguin a three-dimensional appearance.
For texturing, experiment with different pencil strokes to mimic the feel of penguin feathers. Try stippling for a more granular texture or blending for a smoother finish. Use an eraser to create highlights and add contrast to your drawing. By combining these techniques, you can achieve a realistic representation of a penguin's plumage.
Common Mistakes to Avoid When Drawing Penguins
Even experienced artists encounter challenges when drawing penguins. One common mistake is neglecting proportions. Penguins have a unique body structure that can be tricky to capture accurately. To avoid this, use guidelines and reference images to ensure your drawing maintains proper proportions. Another pitfall is over-detailing too early in the process. Resist the urge to add fine details until you've established a solid foundation for your drawing.
Over-shading is another issue that can detract from the realism of your penguin. Too much shading can make your drawing appear flat or muddy. Instead, focus on creating subtle variations in tone and texture. Use a light touch when applying shading, gradually building up layers to achieve the desired effect. Finally, don't overlook the importance of negative space. The areas around your penguin contribute to its overall composition, so take care to balance positive and negative elements in your drawing.
How to Draw Realistic Penguin: Step-by-Step Guide
Now that we've covered the fundamentals, let's walk through a step-by-step guide for drawing a realistic penguin:
- Step 1: Sketch the Basic Outline. Use simple shapes to establish the proportions and posture of your penguin.
- Step 2: Refine the Outline. Smooth out the edges and adjust proportions as needed to create a more polished shape.
- Step 3: Add Facial Features. Carefully sketch the eyes, beak, and other key details, paying attention to their placement and proportions.
- Step 4: Texture the Feathers. Use short, overlapping strokes to mimic the texture of penguin feathers, varying pressure for added realism.
- Step 5: Apply Shading. Identify the light source and use hatching and cross-hatching techniques to add depth and dimension to your drawing.
- Step 6: Finalize Details. Add finishing touches, such as highlights and subtle variations in tone, to bring your penguin to life.
By following these steps, you'll be able to create a realistic and engaging penguin drawing that showcases your artistic skills.
What Are Some Tips for Improving Your Penguin Drawing Skills?
Improving your penguin drawing skills requires practice and dedication. Set aside regular time to sketch and experiment with different techniques. Keep a sketchbook to track your progress and identify areas for improvement. Seek feedback from fellow artists or online communities to gain new perspectives on your work. Additionally, challenge yourself by trying different mediums and styles to expand your artistic repertoire.
How Can You Stay Motivated While Learning to Draw Penguins?
Staying motivated can be challenging, especially when faced with setbacks or plateaus in your progress. To maintain enthusiasm, set realistic goals and celebrate small victories along the way. Surround yourself with inspiration, whether through nature documentaries, art books, or fellow artists. Remember that every drawing is an opportunity to learn and grow. Embrace mistakes as part of the process and use them as stepping